How to Configure an Apache Hadoop Cluster on AWS EC2
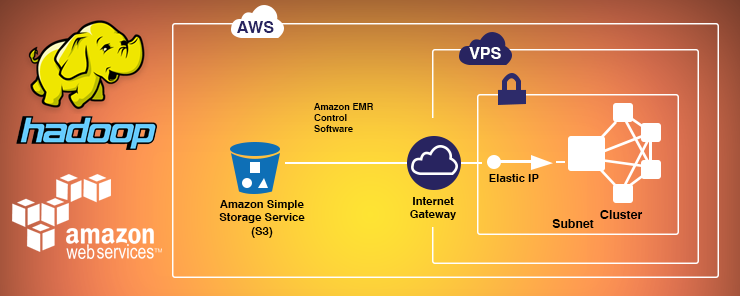
Our setup involves a single NameNode and three DataNodes which serve as processing slaves.
Starting with setting up the AWS EC2 resources, we take you all the way through complete configuration of the machines in this arrangement.
We use Apache Hadoop 2.7.3 for this demonstration.
Starting with setting up the AWS EC2 resources, we take you all the way through complete configuration of the machines in this arrangement.
We use Apache Hadoop 2.7.3 for this demonstration.
Pre-Requisites:-
Sign up for an AWS account if you don’t already have one. You get some resources free for the first year, including an EC2 Micro Instance.
AWS EC2 Startup:-
We will now create 4 instances of Ubuntu Server 16.04 LTS using Amazon EC2.
Select Instance:-
Go to your AWS Console, Click on Launch Instance and select Ubuntu Server 16.04 LTS.

Instance Type:-
For the instance type, we choose t2.micro since that is sufficient for the purposes of the demo. If you have a need for a high-memory or high-cpu instance, you can select one of those.

Click Next to Configure Instance Details
Instance Details:-
We request 4 instances of the selected machine type. We also have to choose a subnet (us-west-1b) so that we can launch into the same location if we need more machines.

Storage:-
For our purpose, the default instance storage of 8GB is sufficient. If we need more storage, either increase the size or attach a disk by clicking “Add Volume”. If you add a volume, we will need to attach the volume to our instance, format it and mount it. Since this is a beginner tutorial, these steps are not covered now.
Instance Tags:-
A tag allows us to identify our instance with a name we can choose.Click Add Tag, set the Key to “Name” and value to “Hadoop”. We will use that tag to re-label our instances as “namenode”, “datanode1” and so on later on. For now leave the value of all the instances as 'Hadoop'.

Security Group:-
For the security group, we have to create a completely open security group for the purposes of testing.
Launch Instances:-
Review the info one more time & click Launch to start the instances. We will need to create a key pair or use an existing key pair. Follow the instructions on the Launch Wizard to create a new key pair. Then click “I acknowledge ..” & then click Launch Instances.
Naming the Instances:-
On the instances page, let us setup the names of the instances. These are not DNS names, but names that we assign to help us distinguish between them.Click the pencil icon next to the name and setup the names as shown.

Setting Up Instances:-
Once the instances are up and running, Then we have the time to set them up for our purpose. This includes the following:Setup password->less login between the namenode and the datanodes.
Install java.
Setup Hadoop.
Copy Instance Public DNS Name:-
We now need to copy the Public DNS Name of each node (1 namenode and 3 datanodes). These names are used in the configuration steps below. Since the DNS is specific to each setup, we refer to the names as follows.Example, In the description below, if you see <nnode>, substitute with the value of <NameNode Public DNS>. Similarly for <dnode1> and so on.
| nnode | <NameNode Public DNS> |
| dnode1 | <DataNode1 Public DNS> |
| dnode2 | <DataNode2 Public DNS> |
| dnode3 | <DataNode3 Public DNS> |
Common Setup on All Nodes:-
Some setup is common to all the nodes: NameNode & DataNodes. This is covered in this section.
All Nodes: Update the instance:-
Let us update the OS with latest available software patches.
sudo apt-get update && sudo apt-get -y dist-upgrade

All Nodes: Install Java:-
Let us now install Java. We have to install package: openjdk-8-jdk-headless on all the nodes.
sudo apt-get -y install openjdk-8-jdk-headless
All Nodes: Install Apache Hadoop:-
Install Apache Hadoop 2.7.3 on all the instances. Obtain the link to download from the Apache website and run the following commands. We install Hadoop under a directory server in the home directory.
All Nodes: Setup JAVA_HOME:-
On each of the nodes, edit ~/server/hadoop-2.7.3/etc/hadoop/hadoop-env.sh.Replace this line:
export JAVA_HOME=${JAVA_HOME}
With the following lines:
export JAVA_HOME=/usr/lib/jvm/java-8-openjdk-amd64
All Nodes: Update core_site.xml
On each node, edit
~/server/hadoop-2.7.3/etc/hadoop/core-site.xml and replace the following lines:<configuration>
</configuration>
with these (as mentioned above, replace <nnode> with NameNode’s public DNS):
<configuration>
<property>
<name>fs.defaultFS</name>
<value><nnode>:9000</value>
</property>
</configuration>All Nodes: Create Data Dir
HDFS needs the data directory to be present on each node: 1 name node and 3 data nodes. Create this directory as shown and change ownership to user ubuntu.
sudo mkdir -p /usr/local/hadoop/hdfs/data
sudo chown -R ubuntu:ubuntu /usr/local/hadoop/hdfs/dataConfiguring NameNode
After performing configuration common to all nodes, let us now setup the NameNode.
Namenode: Password Less SSH
As mentioned before, we need password-less SSH between the name nodes and the data nodes. Let us create a public-private key pair for this purpose on the namenode.
namenode> ssh-keygen
Use the default (
/home/ubuntu/.ssh/id_rsa) for the key location and hit enter for an empty passphrase.Datanodes: Setup Public Key
The public key is saved in
/home/ubuntu/.ssh/id_rsa.pub. We need to copy this file from the namenode to each data node and append the contents to /home/ubuntu/.ssh/authorized_keys on each data node.datanode1> cat id_rsa.pub >> ~/.ssh/authorized_keys
datanode2> cat id_rsa.pub >> ~/.ssh/authorized_keys
datanode3> cat id_rsa.pub >> ~/.ssh/authorized_keysNamenode: Setup SSH Config
SSH uses a configuration file located at
~/.ssh/config for various parameters. Set it up as shown below. Again, substitute each node’s Public DNS for the HostName parameter (for example, replace <nnode> with EC2 Public DNS for NameNode).Host nnode
HostName <nnode>
User ubuntu
IdentityFile ~/.ssh/id_rsa
Host dnode1
HostName <dnode1>
User ubuntu
IdentityFile ~/.ssh/id_rsa
Host dnode2
HostName <dnode2>
User ubuntu
IdentityFile ~/.ssh/id_rsa
Host dnode3
HostName <dnode3>
User ubuntu
IdentityFile ~/.ssh/id_rsa
At this point, verify that password-less operation works on each node as follows (the first time, you will get a warning that the host is unknown and whether you want to connect to it. Type yes and hit enter. This step is needed once only):
namenode> ssh nnode
namenode> ssh dnode1
namenode> ssh dnode2
namenode> ssh dnode3Namenode: Setup HDFS Properties
On the NameNode, edit the following file:
~/server/hadoop-2.7.3/etc/hadoop/hdfs-site.xml
Replace:
<configuration>
</configuration>
With:
<configuration>
  <property>
    <name>dfs.replication</name>
    <value>3</value>
  </property>
  <property>
    <name>dfs.namenode.name.dir</name>
    <value>file:///usr/local/hadoop/hdfs/data</value>
  </property>
</configuration>
Namenode: Setup MapReduce Properties
On the NameNode, copy the file (
~/server/hadoop-2.7.3/etc/hadoop/mapred-site.xml.template) to (~/server/hadoop-2.7.3/etc/hadoop/mapred-site.xml). Replace:<configuration>
</configuration>
With this (as above replace <nnode> with NameNode’s public DNS):
<configuration>
  <property>
    <name>mapreduce.jobtracker.address</name>
    <value><nnode>:54311</value>
  </property>
  <property>
    <name>mapreduce.framework.name</name>
    <value>yarn</value>
  </property>
</configuration>
Namenode: Setup YARN Properties
Next we need to set up
~/server/hadoop-2.7.3/etc/hadoop/yarn-site.xml on the NameNode. Replace the following:<configuration>
<!-- Site specific YARN configuration properties -->
</configuration>
With (as before, replace <nnode> with NameNode’s public DNS):
<configuration>

  <!-- Site specific YARN configuration properties -->
  <property>
    <name>yarn.nodemanager.aux-services</name>
    <value>mapreduce_shuffle</value>
  </property>
  <property>
    <name>yarn.nodemanager.aux-services.mapreduce.shuffle.class</name>
    <value>org.apache.hadoop.mapred.ShuffleHandler</value>
  </property>
  <property>
    <name>yarn.resourcemanager.hostname</name>
    <value><nnode></value>
  </property>

</configuration>
Namenode: Setup Master and Slaves
On the NameNode, create
~/server/hadoop-2.7.3/etc/hadoop/masters with the following (replace <nnode> with the NameNode’s public DNS):<nnode>
Also replace all content in
~/server/hadoop-2.7.3/etc/hadoop/slaves with (replace each of <dnode1>, etc with the appropriate DateNode’s public DNS):<dnode1>
<dnode2>
<dnode3>Configuring Data Nodes
After covering configuration common to both NameNode and DataNodes, we have a little bit of configuring specific to DataNodes. On each data node, edit the file
~/server/hadoop-2.7.3/etc/hadoop/hdfs-site.xml and replace the following:<configuration>
</configuration>
With:
  <property>
    <name>dfs.replication</name>
    <value>3</value>
  </property>
  <property>
    <name>dfs.datanode.data.dir</name>
    <value>file:///usr/local/hadoop/hdfs/data</value>
  </property>
Starting the Hadoop Cluster
After all that configuration, it is now time to test drive the cluster. First, format the HDFS file system on the NameNode:
namenode> cd ~/server
namenode> ./hadoop-2.7.3/bin/hdfs namenode -format
Finally, startup the Hadoop Cluster. After this step you should have all the daemons running on the NameNode and the DataNodes.
namenode> ./hadoop-2.7.3/sbin/start-dfs.sh
namenode> ./hadoop-2.7.3/sbin/start-yarn.sh
namenode> ./hadoop-2.7.3/sbin/mr-jobhistory-daemon.sh start historyserver
Check the console carefully for any error messages. If everything looks OK, check for the daemons using
jps.namenode> jps
You can also check on the datanodes for java processes.
datanode1> jpsCheck the Web UI
Once the cluster is running, we can check the web UI for the status of the data nodes. Go to <nnode>:50070 for the Web UI and verify that the 3 data nodes added are online.
Summary
This article showed you how to setup Apache Hadoop on an Amazon EC2 cluster. Starting with standard Ubuntu 16.04 LTS instances, we configured the machines with Java and Apache Hadoop. Next we covered setting up various Hadoop components according to the role on each node. In the next article in this series on Apache Hadoop, we look into running jobs on the cluster.
Source:- http://www.novixys.com/blog/setup-apache-hadoop-cluster-aws-ec2/ (Thanks)
